Destination – Desolation Wilderness


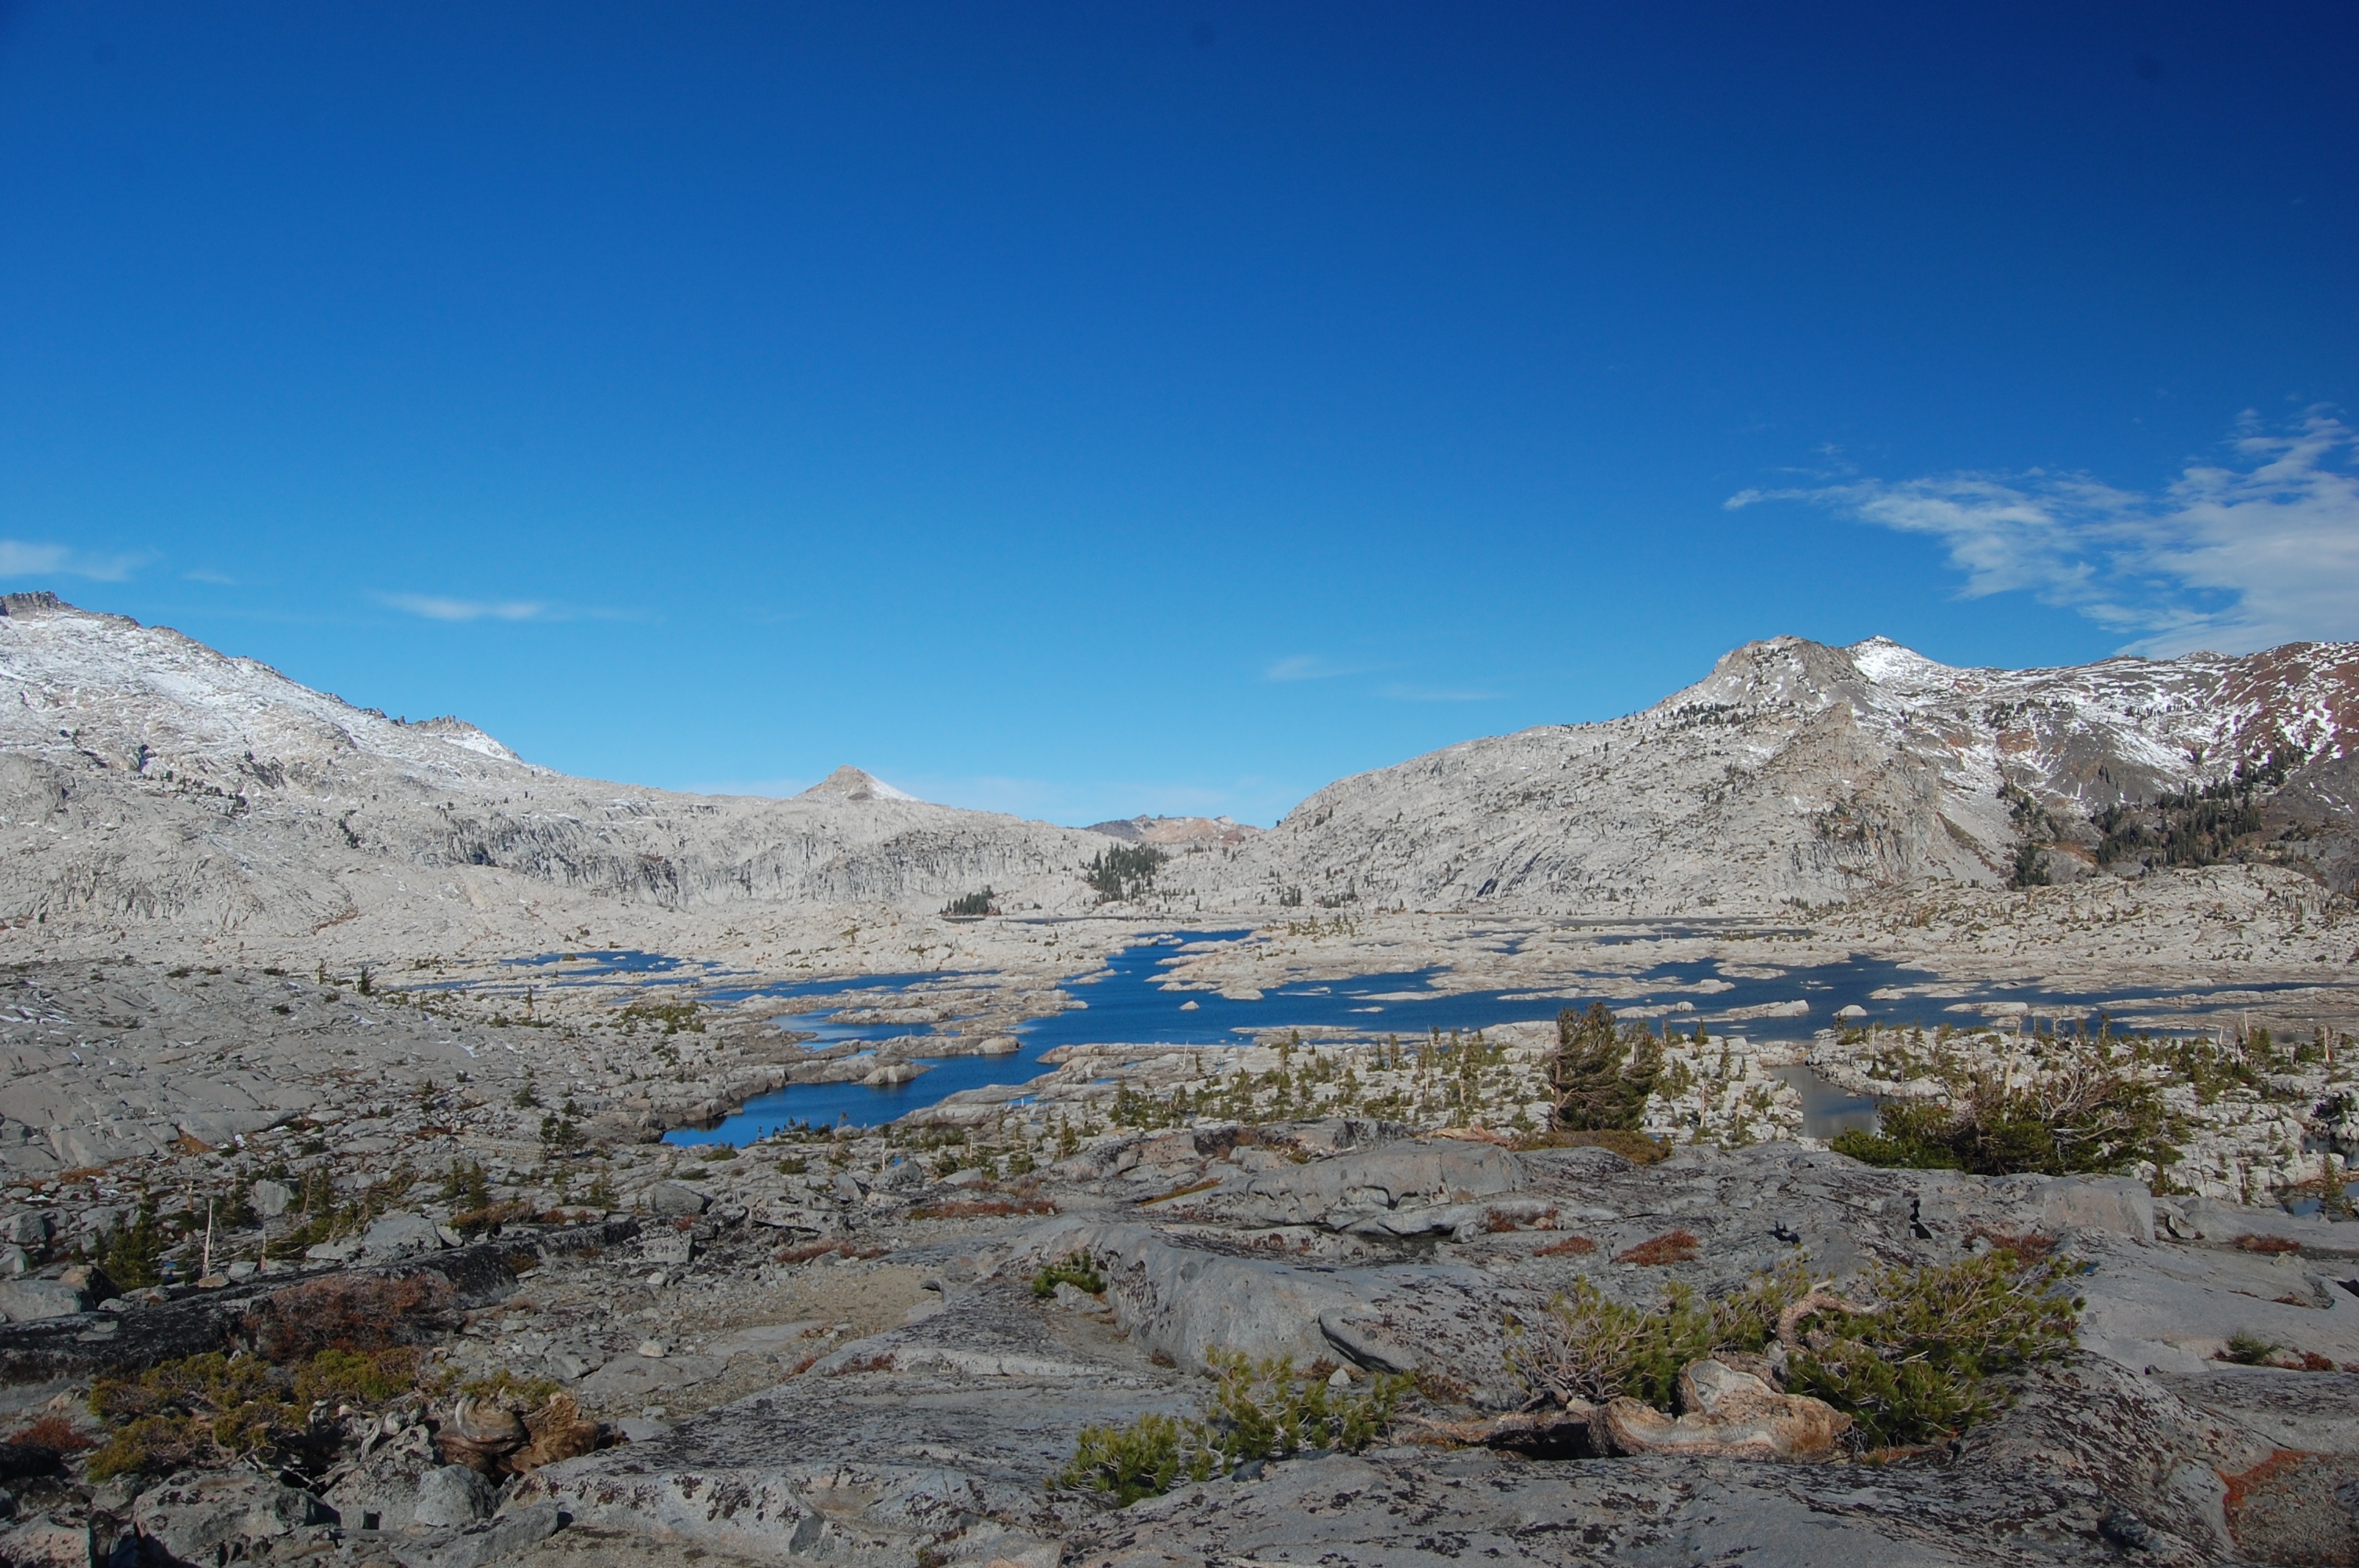
Desolation Wilderness, Creative Commons photo by Abby Swann

When I talked to people about leading beginners to go backpacking, one of the destinations that often came up was the Desolation Wilderness.  All the joking about the name aside, the pictures I saw so far all suggested that this is a “desolation” well worth visiting!

Desolation Wilderness is situated in the southwest corner of Lake Tahoe and contains places such as Mt Tallac, Dicks Peak, Lake Aloha, Lake of the Woods, etc.


Desolation Wilderness, Creative Commons photo by Jan Gosmann

From what I read, the heart of this place is Lake Aloha. On the map this is the largest body of water in this area.


Lake Aloha, Creative Commons photo by Abby Swann


Middle Velma Lake (DSC_9965), Creative Commons photo by Ilya Katsnelson


Echo Lake Paradise, Creative Commons photo by Christian Arballo

Logistics:

The scenery is quite excellent!  Because of that, this area could get heavily used and use of this area for backpacking purposes is managed with a quota system by the Eldorado National Forest district (from Friday before Memorial Day to 9/30).  70% of the quota is reservable through Recreation.gov, and the other 30% are first-come first-serve on the day of starting at 8AM.  The key information for both method is the destination zone (see below).

For in-person reservation, you also need to decide which trailhead to take.  Depends on which side of the wilderness the trailhead is, the in-person locations are different (links take you to creating a direction using Google Map).

West side entry (Buck Island, Look Lake, Van Vleck, Wrights Lake, Lyons Lake)

  1. Pacific Ranger Station (Tel: 530-647-5415)

East side entry (Ralston, Echo Lakes, Aloha Lakes, Glen Alpine, Cathedral, Mt Tallac, Bayview, Eagle Lake, Meeks Bay, General Creek)

  1. Lake Tahoe Basin Management Unit Supervisor’s Office (Tel: 530-543-2600)
  2. Lake Tahoe Visitor Center (Tel: 530-543-2674)

The trailhead and zone system probably need some explanation.  There are a total of 15 trailheads with which you can access the Desolation Wilderness, divided into East and West side entries (marked as TH below).

stelprdb5292620

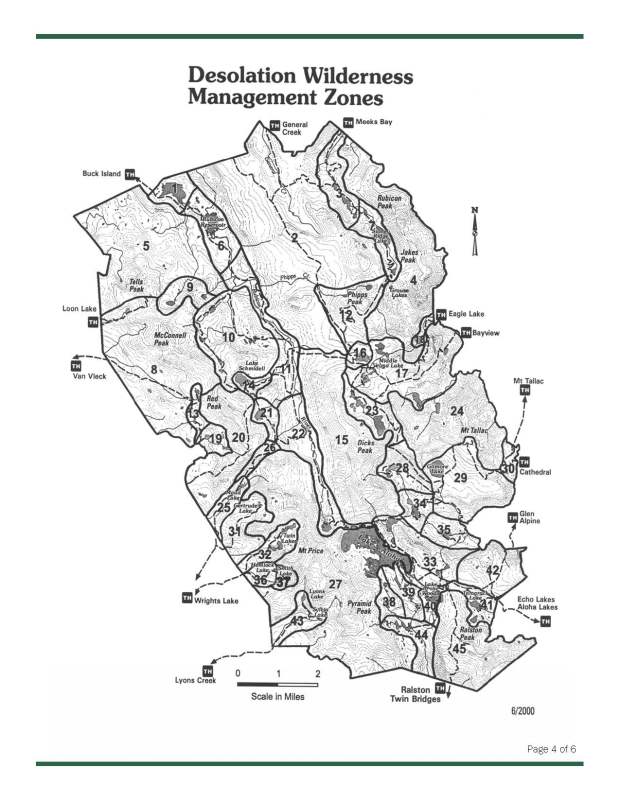
Map of Zones, pdf available here at Eldorado National Forest site

Apart from deciding which trailhead to take, you also need to decide on where to camp overnight.  These locations are designated as “zones”.  These are numbered below.  For example, popular locations such as Lake Aloha are surrounded by zone 27, 33, 38, 39, etc. and Velma Lakes will be 16 and 17.  These are the zone number you will need to reserve your backcountry permits.  Each zone has an overnight quota, and you can see that information here.

DWTPG_Page_03

Map of Zones in Desolation Wilderness Trip Planning Guide

The zone system is only in effect for the first night.  From second night onward within the same trip, there is no restriction.

Apart from the quota, there are also the usual restrictions for backpacking in the Sierras, such as no campfire (stove cooking only), bear canister, and maximum party size of 12.

Itineraries:

  1. Bayview – Velma Lakes (zone 16 & 17): I came across this itinerary here.  The backpacker started from Bayview trailhead, camped at Velma Lakes, and exited through Eagle Lake trailhead.
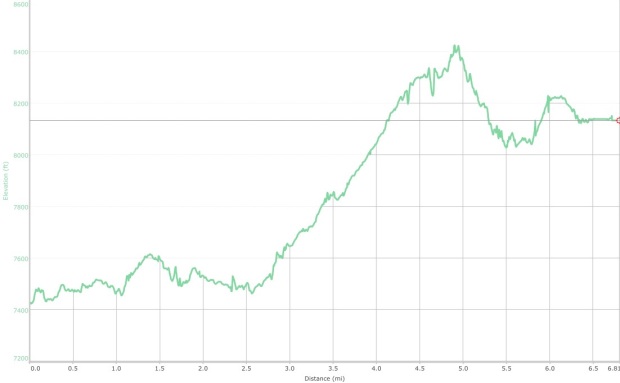
  2. Echo Lake – Lake Aloha (zone 33, 38, 39): This seems to be a very popular itinerary.  I came across this itinerary here and here.  From Echo Lake to Lake Aloha is a 6.8 mile (one way) hike with a 700 ft elevation gain. Echo to Aloha
  3. Glen Alpine – Lake Aloha: An excellent write-up with pictures here.


Useful Links:

  1. Eldorado National Forest information on Desolation Wilderness Permits
  2. Everytrail.com search results for Desolation Wilderness
  3. Tom Harrison map on Desolation Wilderness via Amazon


Destination – Saddlebag Lake/20 Lakes Basin

Total distance: ~ 8 miles (loop)
SaddlebagLake
Elevation changes: +/- 1300 feet (approx.)
Entry Trailhead: Saddlebag Lake
Exit Trailhead: Saddlebag Lake

One big challenge about backpacking in Yosemite is the permit system.  Either you put in the request months in advance but didn’t get what you want, or you want to go on an overnighter but the trailhead you want is booked solid.

That is why Saddleback Lake (also known as 20 Lakes Basin) is such a gem.  It is right outside of the Tioga entrance and part of the Hoover Wilderness, managed by Inyo National Forest.  It does not see as much traffic as other locations and therefore there is no quota on the trailhead.  All you need is to get to the Mono Lake Visitor Center for a free permit, and you are good to go.  Therefore it is much easier to come here on the spur of the moment.

And the scenery is quite good!


There are alpine lakes, meadows, snowy peaks…


The hike starts at the dam of the Saddleback Lake. There are three ways to start: (i) hike the more rugged but shorter west side, (ii) the more smooth but longer east side, or (iii) pay $10 to take the cross-lake ferry.


The lakes in the basin are linked together by a loop trail. Because of snowmelt, the trail is not often visible. There are also a few places where you have to cross the creek that could be dangerous depending on the water-flow.


We find that a good map for the area is not necessarily the Tom Harrison, but a topo map you could buy at the Visitor Center for $10.


Because of the scenery and the ease of planning, I would wholeheartedly recommend this trip. We in fact went there in June 2016, so stay tuned for the trip report!


Logistics:

  • Click here to generate direction to Mono Lake Visitor Center via Google Map.
  • Click here to generate direction to the dam of the Saddleback Lake

Topo created with Garmin Basecamp, note that the trail crosses Lundy Pass:
20LakesBasinTopo

Elevation Profile:
20LakesBasinElevation

Further Reading:

  1. Greg’s Hiking Adventure write-up, pictures and GPX
  2. USDA National Forest page for the Saddleback Trail

Trip Report – Young Lakes/Roosevelt Lake July 2013

Total distance: 13.5 miles (loop)
Elevation changes: +2669 ft / -2728 ft
Entry Trailhead: Young Lakes via Glen Aulin
Exit Trailhead: Young Lakes via Dog Lake
Date: 7-19-2013 to 7-20-2013

It is hard to believe that we went on this trip THREE years ago and I have yet to write up a trip report for it.  Well, better late than never, considering that this was one of my most favorite trips!

We split up into two different groups going in from two different trailheads.   Here was me working on the GPS at the Glen Aulin parking lot and taking the mandatory Tough Guys Picture™ with my Hasselblad.

Hiking in was quite uneventful and we caught quite a good view of the Tuolumne Meadows.

Taking the trail towards Young Lake from the Glen Aulin trail.

Ng_Hass400H_r175f7

As planned, we met the other group at the junction where the two trails, one from Glen Aulin and the other from Dog Lake, met.  After a brief rest to check maps, we took off for the final stretch to the Young Lakes basin.

Ng_Hass400H_r175f7

Ng_Hass400H_r175f7


Even though I read up on this trail before, I still made the mistake of taking a use trail by the waterfalls that connected the Young Lakes.  Had we walked more towards the north, there would have been a broader and flatter meadows that bypass the use trail (see the topo map).  By the time we arrived, it was dusk already.  The basin actually opened towards west and thus the surrounding mountains were all bathed in the warm sunset light.  The most prominent peak in the area is Ragged Peak, which looks to live up to its name.

Sunrise at the campsite.

Ng_Hass400H_r176f9


The next day we woke up and cooked up quite a meal.  We should have tried out our recipes back at home.  As it was, we realized that cooking pancake in the wild was more challenging than thought.  Here were pictures of those that resembled pancakes.

After breakfast, we broke down our tents and cached the bulk of our gears at the campsite. We decided to trek over to Roosevelt Lake.  As there were no obvious trails, we tried to maintain the same elevation (~10000 ft) as we trekked towards the Lake.

Taking this route took us around the bottom of Mt. Confess, which in retrospect, was more rocky than necessary.

Ng_Hass400H_r175f7


Nonetheless, we were able to reach Roosevelt Lake in good time.  This lake without a doubt was one of my most favorite lakes in Yosemite so far.  We ran into some Park rangers conducting a survey in the area and also a group of backpackers who trekked over from the 20 Lakes Basin.

Ng_Hass400H_r175f7


On our return trip, we took a more direct route towards the campsite to save time.  It was a lot more climbing than the other route but not too bad.

Ng_Hass400H_r175f7

Ng_Hass400H_r175f7


This was when we spotted some clouds moving in.
Ng_Hass400H_r175f7


Those clouds turned out to be the front of some more thundercloud and made our return trip quite exciting (the famous Sierra Nevada afternoon storm).  Some of the return route were quite exposed so we had to hike off trail to maintain coverage.  We ran into the same rangers we met earlier and they advised us to just run, which we did.

I could still remember this trip 3 years later… which goes to show you how memorable this trip was!

Ng_HassNPH400_r177f11


Pictures by Warren N. (EM5), and Kit N. (Film + Hasselblad)

Some Footnotes:

A rough track in GPX format can be downloaded here.

Topo Map:

YoungLakes

Elevation Profile:

YoungLakesRT.jpg

Cleaning up after a trip

After all the fun and excitement , after the long drive home, with that hamburger/steak salad from the celebration dinner sitting comfortably in your stomach, it’s time to clean up the gears.  Since we have a central deposit for the gears, cleaning things up well will really help the next group.  Therefore, in no particular order, this is how we usually clean up:

Hiking Sticks

Ng_160703_PCLBackpacking_R020089

We usually soak the handles of the hiking sticks in soapy water and then air dry those in the sun.  That usually helps to clean up the gunk that are left on the handles.


Backpacks

Ng_160703_PCLBackpacking_R020090

After removing all the items from the dozens of small pockets, we just wipe down the dirt on the outside with a wet towel.


Electronics

_R020364

For any electronics (whether it be GPS or headlight), I typically removed the battery and then put everything in a Ziploc bag.  That should prevent battery corrosion from destroying the unit.


Sleeping Bags

Ng_160703_PCLBackpacking_R020088

We usually just air out the bags in the sun, unless something really catastrophic happened that required washing.

_R020360

Once the bags are aired out, I usually put it in a cotton duffel bag.  The key is to maintain the fluff and not compressing it.  Thus leaving the sleeping bags all rolled up in a stuff sack is probably the WORST that you can do (okay, maybe right after washing the bag with regular detergent).

Trip Report – Glen Aulin June 2013

Another group went on the Glen Aulin/Waterwheel Falls backpacking trip described here.

Total distance: 18.2 miles (In and out)
Elevation changes: +/- 2000 feet (approx.)
Entry Trailhead: Glen Aulin
Exit Trailhead: Glen Aulin
Dates: 6-28-2013 to 6-29-2013

For the second time a crew from Gracepoint Davis tackled this particular trail, we went in very excited and determined to test a lot of the new equipment that we had managed to procure for our first summer with several backpacking trips planned. We also started quite late. We arrived at the trail head after 4 in the afternoon, and were quite surprised to learn that there was no camping allowed along the actual trail. This of course meant that we had to cover 5.3 miles or so before sundown. Or at least try. With this in mind, we started out from the Soda Springs parking lot at a strong pace.

P1050105

Starting our hike, we went along the beautiful Tuolumne Meadows until we found our trail to Glen Aulin. This photo came from shortly after we  started our hike, and shows just how late it was when we started

P1050113

We traveled through somewhat wooded  county as we went along the first part of the hike, where our late start  afforded us some spectacular views of sunset coming through the trees

P1050111

The trail crosses two streams, so some dampness may be acquired along this hike. This isn’t one of the crossing points, but this stream ran parallel to the trail for a long while before the trail crossed over

P1050135

We’d been warned that, while usually easy to follow, the trail seemed to disappear when it came to a small granite shelf. Here it angled north for a short bit, and you had to actually find the stone steps as it descended from the shelf toward the valley. The granite shelf presents a great view of the valley, and affords people the opportunity to take a picture with a spectacular sunset in the background.

P1050133

The hidden steps

P1050140

The trail also goes over a couple of bridges. This is the view from one of the bridges right at sunset. We ended up having to hike for a little while with flashlights, and fortunately the trail is pretty clear with flashlights

P1050142

Our campsite the next morning. We didn’t quite make it off the Glen Aulin trail, so we ended up camping near White Cascades

P1050156

Which afforded us this view in the morning

P1050172

Our marmot visitor

P1050201

We managed to hit the trail again a little after 10, after ditching most of our heavy gear near the campsite and hiding it in a small copse. Whereas most of the hike the day before had been up and down through rolling countryside, we now began our descent into the well named Grand Canyon of the Tuolumne. One of our first sights was White Cascades, a gorgeous waterfall. If you love waterfalls high in the mountains, this is the trip for you

P1050236

Our first major break to refill our water and eat some snacks was at these cascades, about an hour after we started the hike

P1050217

The trail follows this river very closely. This is just after the cascades, standing on some switchbacks that lead down to the beach. The section after the switchbacks, following the river down there, is probably the most gentle part of the trail. It’s fairly flat until California falls, crossing right through a beautiful riparian ecosystem with plenty of opportunities to walk in the shade

P1050272

P1050262

We made it to Waterwheel falls in the early afternoon, and it proved an excellent spot for lunch and a break before ascending back out of the valley. The view is spectacular, and the Waterwheel that gives this fall its name was very impressive. So impressive that some of our hikers actually took a nap

P1050268

This is another aspect of the waterfall that we all really loved. The water climbs up this outcrop and sprays outward

P1050278

Some of us felt that our time could be better spent than simply napping

P1050312

We managed to actually hike all the way from Waterwheel falls to the Soda Springs parking lot, setting off at 2 in the afternoon and leaving the trail head around 8 in the evening. Impressive for a crew of mostly inexperienced backpackers. The strenuous pace and fairly rough terrain required a few short rests on the way up, but we still managed to retrieve our gear around 4:30 and take a rest near our campsite until about 5. We took this shot when we got back to Tuolumne Meadows, much more tired than when we started the day before.

P1050314

Our backpack trip concluded with a glorious sunset painting these clouds and many of the granite formations in the Meadows with beautiful reds and pinks.

Concluding notes:

P1050208

Make sure to have plenty of water carrying containers with you. One thing that I think really hurt us was that most of the guys didn’t have very many bottles with them, and one of us only had a 16 fluid ounce Aquafina bottle with him. We were particularly fortunate to have a Katadyn Hiker Water Filter with us and a lot of places along the river to pick up water.

P1050176

Carry plenty of bear canisters to hold your food and smellables in. Somehow we couldn’t fit everything in what we brought, and so had to hope that we wouldn’t get visited. Surprisingly, our only visitor was a marmot that didn’t bother to come too close to our campsite. We were particularly lucky on this one.

Photo and words by Jacob H.

Trip Report – North Dome/Yosemite Falls

A report of a group going on the North Dome/Yosemite Falls hike.

Total distance (one way): ~12.17 miles
Elevation change: +1852 ft, -6052 ft
Entry trailhead: Porcupine Creek
Exit trailhead: Yosemite Falls
Dates: 6-28-2013 to 6-29-2013

This trip marked the first backpacking trip for Gracepoint Davis this year! During the June 28th weekend, we sent out two backpacking teams: one to Tuolumne Meadows up to Waterwheel Falls and the other from Tioga Road (Highway 120) to Yosemite Falls. The Yosemite Falls team was led by Lem and accompanied by c/o 2015 brothers some of whom were veterans of last years backpacking adventures.

The trip was planned rather spontaneously as the wilderness passes were originally reserved for another group, but logistics came out smoothly. The plan was to park along Porcupine Creek trail head and then proceed to hike to North Dome by nightfall.

Image

Porcupine Creek Trailhead, photo by J. Loomis

Image

We camped on Indian Ridge just before North Dome. Indian ridge overlooks North Dome, has a great view of Half Dome, and is an excellent location to set up camp. There is a lovely clearing with sandy soil by the trail and plenty of firewood nearby. Unfortunately there isn’t a water source close by so be sure to have enough water for breakfast if you camp here. Great location for stargazing.

Image

Campsite location with the guys with a great view of Half Dome in the background.

Image

After breaking camp, we proceeded to hike toward North Dome just down the ridge. Along the trail there are amazing sights of the valley and of Half Dome.

Image

The trail to North Dome includes a very steep and rocky descent so we stored our packs at the base of one of these trails and then proceeded on hiking for another 15 minutes to North Dome (the trail doubles back to get to Yosemite Falls, so leaving the bags to save energy is suggested).

From North Dome we had a 270 degree view of Yosemite Valley.

After North Dome we hiked through a shady, forested trail toward Yosemite Falls. The trail included several seasonal and all-year creeks. At one well-moving creek we washed up, filtered fresh mountain water for the entire team, and had a snack.

Not long after we reached Yosemite Creek which feeds the Upper Yosemite Falls. At the creek, there are plenty of locations to take a dip, with a few protected pools safely far from the falls. We did find a view crazy individuals who swam a mere yards from the edge.Image

Bridge across Yosemite Creek

We then hiked 10 minutes to Overlook Point which there is a precariously narrow trail to a small landing that overlooks the falls.

Image

Overlook Point

Image

Path to Overlook

From Overlook we traveled down to the Valley, but through a strenuous 3 mile path of granite switchbacks. The path took over two hours and was very hard on the knees as it was constant downhill on rocky surfaces and the occasional stone was covered in sand and slippery. Eventually we reached the base of the trail at Camp 4 in Yosemite Valley. At the nearby Yosemite Lodge we picked up Tuolumne Meadows Hikers Bus tickets that we had previously reserved via phone call and proceeded to taking the free Yosemite Valley Shuttle to the Backpackers Campsite behind North Pines Camp Grounds (Shuttle Stop # 18)

That night we set up camp with other backpackers, ate a delicious ramen meal and spent some time back in civilizations at a cafe in Curry Village. There we had several scoops of ice cream.

The temperature in the Valley is much higher than in the hills so some of us spent the night outside the tent just sleeping under the stars.

The next morning we quickly broke camp and took the first shuttle to Curry Village to make it to our 8:00AM pickup for the Tuolumne Meadows Hikers Bus. The bus itself was a cross between a shuttle and a tour bus as the driver took custom drop off locations from the passengers, but still narrated the entire trip. Because of so many people boarding and departing the bus, the ride from the Valley back to Porcupine Creek Trail Head was over 2 hours. It was a lovely way to end the trip however, in the comforts of air conditioning.

Image

 Photos and word by Greg W.

Destination – Backpackers Campgrounds in Yosemite

If you read your wilderness permit carefully, you will read that you can stay up to one night before and after your backpacking trip at “backpackers campground.”  Well where are they?  This article will focus on just two of them – Tuolumne Meadows and the Yosemite Valley.

Ng_20120714_yosebackpacking_1140218

By Tuolumne River


Tuolumne Meadows Backpackers Campground

It is found in the Tuolumne Meadows campground (duh!) and apparently it is behind the Dana fire-pit, between the A and B loop.  See the map below:

tuolumne_meadows_campground_map

Notice that this map is north-south reverse.  Therefore if you are driving from the west side, this campground will be on your right.

Yosemite Valley Backpackers Campground

On the other hand, the backpackers campground in Yosemite valley is not as well marked.  You would not see it on the map, though if you do a search on Google for the “North Pines backpackers campground,” you might come across Park service document showing:

CapturFiles_2

Notice that the backpackers campground is north of North Pines across a bridge.  There is no parking access and therefore you have to park elsewhere after you are done unloading.

Last but not least, these campgrounds charge $5 per person per night.  Thus be ready to pay up.

Trip Report – Glen Aulin July 2012

Total distance: 18.2 miles (In and out)
Elevation changes: +/- 2000 feet (approx.)
Entry Trailhead: Glen Aulin
Exit Trailhead: Glen Aulin
Date: 7-13-2012 to 7-14-2012

As the inaugural backpacking trip for Gracepoint Davis, this was an exciting day! Some of 2014 brothers, Pastor Will and I took off for Yosemite in the early hours. The weather forecast wasn’t great, and from a distance we could even see ominous cloud above the planned trail (Nelson Lake). But thanks to the Park rangers, we could switch our reservation to the Glen Aulin to Waterwheel Falls trail (apparently some groups dropped out due to bad weather forecast) in exchange for us picking up trash along the way. Of course!

Ng_20120713_yosebackpacking_1120987

Group picture by the stable on the same road as the Lembert Dome parking lot.

Ng_20120713_yosebackpacking_1120988

For the first mile or so the trail is in the same direction as Soda spring and Parsons Lodge.

Ng_20120713_yosebackpacking_1120992

The trail is well-marked and follows the Tuolumne river.

Ng_20120713_yosebackpacking_1120999

Now the direction sign says Waterwheel Falls, which was our destination.

Ng_20120713_yosebackpacking_1140031The trail is well maintained as it is the major trail to the Glen Aulin Sierra High camp.  We only had one trouble spot right after this granite.  We missed the stone steps to our right immediately after this portion, but that was not too bad and we quickly found the way.

Ng_20120713_yosebackpacking_1140040

After that granite steps, we crossed a bridge above the Tuolumne River and entered the White Cascades area.  As the name suggests, it is a series of small cascades that feed into the Tuolumne Valley…

Ng_20120713_yosebackpacking_1140044

Tuolumne Valley is the one on the left in this picture.

Ng_20120713_yosebackpacking_1140071

We followed the sign that took us to the High Sierra camp at Glen Aulin and it was first of the many big waterfalls we would be seeing that day.

Ng_20120713_yosebackpacking_1140076

Glen Aulin.

Ng_20120713_yosebackpacking_1140083

Here is a look down the valley we will be hiking in.  There are multiple cascades and also a few bigger waterfalls along the way.

Ng_20120713_yosebackpacking_1140086

Ng_20120713_yosebackpacking_1140110

I think it really is possible to get waterfall fatigue along this trail.. which is a good thing!

Ng_20120713_yosebackpacking_1140097

The trail is pretty much downhill from Glen Aulin High Sierra Camp, and the trail is well maintained.

Ng_20120713_yosebackpacking_1140117

After too may rest stops, we finally arrived at our destination Waterwheel Falls in about 7 hours.  The water was not at high level when we got there, but the “waterwheel” was nonetheless impressive.

Ng_20120714_yosebackpacking_1140133

We established our campsite on a slanted granite above Waterwheel Falls.  In retrospect there was too much of a slope to camp on and immediately to the right of this granite shelf, was a pre-established campsite.

Ng_20120714_yosebackpacking_1140128

A view from my tent.  You can see a smidge of the Waterwheel Falls.

Ng_20120714_yosebackpacking_1140131

The cooking area was about another 100 feet down the slope away from our campsites.  Here is a picture showing Lewis using the Sea to Summit foldable water bucket to carry water up from the river.

Ng_20120714_yosebackpacking_1140134

After a quick breakfast of couscous, we started the journey back… all the way uphill.  It really wasn’t too bad since we knew how far it was supposed to be, and we had all day to make it back.  We made good time and Pastor Will even had time to squeeze in some fly-fishing.  Here is a picture right around the time he caught one (that swam away).

Ng_20120714_yosebackpacking_1140220

In retrospect, we overpacked but I suppose that was excusable since we were expecting bad weather up at Nelson Lake.  This trip also taught us the valuable lesson of packing light.

Until next time!

Google cannot generate driving direction to the trailhead parking lot (the marked spot).  Click here to generate direction to the closest intersection where you need to make a right turn to the parking lot.

CapturFiles

The GPS track can be downloaded here.

GA topo

GA

Destination – June Lake Loop Campsites

Total distance: N/a  

June Lake Loop

Elevation changes: N/a
Entry Trailhead: N/a
Exit Trailhead: N/a

Right outside of Tioga Pass entrance is a string of lakes at June Lake Loop.  These beautiful lakes were (maybe still?) the favorite resorts among Hollywood stars.  I only had experience with two of the campgrounds: Oh Ridge and Silver Lake.

June Lake Detail

Coming from the north, we made a left turn at June Lake Loop south and followed the road for another 1 mile before making a right turn.  Once we made the right turn, we looked for a sign that says Oh Ridge campground or June Lake beach access.  It was a bit tricky to find it since we got there late at night!

Oh Ridge is one of the biggest campground in the loop and we stayed at the “Owl” loop.  Each site has its own picnic table and a grill.  Each loop (there are nine total with about 10 campsites each) has bathroom and drinkable water from a faucet.  Of the two times I stayed there, once it snowed (Memorial Day Weekend in May!), and the other time was very pleasant.

Ng_20120526_sophbroscamping_5260256

Snow camping in May

Ng_120902_praxisbroscamping_9020013

Patrick pondering the ribs we were about to eat next to the campsite grill

Ng_20120526_sophbroscamping_5260265

Some guys getting water from the campsite.

Near the Oh Ridge campsite is June Lake.  Department of Fish and Game stock this lake periodically and the schedule can be found here.

Ng_20120526_sophbroscamping_5260269

June Lake

Usually I take the north exit of June Lake Loop to go back onto US-395.  Reason?  You will pass by the biggest lake in the loop Grant Lake with Mono Craters as background.  Well worth the drive if you ask me.

Ng_20120526_sophbroscamping_5260298

Grant Lake with Mono Craters in the background

b361_157

Looking back from north exit, June Lake Loop.

For more information and reservation, Oh Ridge can be found here and Silver Lake (smaller campsite that is quite attractive) can be found here.  Click here for directions to Oh Ridge and here to Silver Lake.